Showing posts with label Widgets. Show all posts

Thursday, May 27, 2010

Create a Page Allowing a Mobile User to Invite a Desktop User to Cobrowse

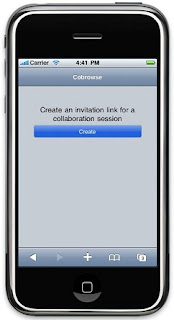
One of the cool new features offered in the CEA Mobile Widgets Technology Preview is the ability to have a desktop user cobrowsing with a user on a mobile device. Since at the time the first user creates the invitation link we don't know if they will share it with a desktop or mobile user we can create the invitation link to a landing page that will re-direct to the page with the appropriate widget.

There are 4 steps to create this landing page. Using JavaScript first strip off the invitation information from the current page. Next check the user agent to determine if the page is running in a mobile browser. If so then redirect to the page containing the mobile widget otherwise redirect to the page for the desktop browser widget. In both cases append the invitation link information. The last step is to edit the joinCollaborationUri attribute in the existing pages for both the mobile and desktop cobrowse to point to this new landing page.

Here is a sample of the HTML/Javascript code for a basic cobrowse landing page:

<html xmlns="http://www.w3.org/1999/xhtml">
<head>
<meta http-equiv="content-type" content="text/html; charset=utf-8" />
<title>CEA Cobrowse Widget</title>

<script type="text/javascript">
var CEA_COLLAB_PREFIX = "cea_collab=";
var href = document.location.href;
var cobrowseString = "";

if ( -1 < href.indexOf(CEA_COLLAB_PREFIX)){

index = href.lastIndexOf(CEA_COLLAB_PREFIX);
collabID = href.slice(index + CEA_COLLAB_PREFIX.length);
cobrowseString = "?" + CEA_COLLAB_PREFIX + collabID;
}

if((navigator.userAgent.match(/iPhone/i)) || (navigator.userAgent.match(/iPod/i)) || (navigator.userAgent.match(/Android/i))) {

window.location = "/cea/cobrowse_mobile.html" + cobrowseString;
} else {
window.location = "/cea/cobrowse_desktop.html" + cobrowseString;
}
</script>

</head>
</html>

Friday, April 30, 2010

Add the Mobile Cobrowse Widget to your Application

After downloading and unzipping the ceadojo.zip directory into the WebContent directory of your application these 5 simple steps will get you up and running with the CEA mobile cobrowse widget:

1. Configure the widget page to be full screen and non-scalable using the viewport meta tag

<meta name="viewport" content="height=device-height, width=device-width,
initial-scale=1, maximum-scale=1, user-scalable=no"/>
2. Import the CEA widget toolkit
<script type="text/javascript" src="./ceadojo/dojo/dojo.js"
djConfig="parseOnLoad: true, isDebug: false"></script>
3. Add the CSS for the mobile cobrowse widget
<style type="text/css">
@import "ceadojo/dijit/themes/tundra/tundra.css";
@import "ceadojo/dojox/mobile/themes/iphone/iphone.css";
@import "ceadojo/cea/mobile/widget/Cobrowse/Cobrowse.css";
@import "ceadojo/cea/mobile/widget/CollaborationDialog/CollaborationDialog.css";
@import "ceadojo/cea/mobile/widget/iFrame/iFrame.css";
</style>
4. Add the following JavaScript code to hide the location bar when the page loads
<script type="text/javascript">
window.onload = function() {
setTimeout(function(){window.scrollTo(0, 1);}, 100);
}
</script>
5. Last place the widget as the only element in the page using the following HTML snippet
<body class="tundra mbl iphone">
<div ceadojoType="cea.mobile.widget.Cobrowse" joinCollaborationUri="/cea/cobrowse.html"
defaultCollaborationUri="/"></div>
</body>


Thanks to Steps 1 and 4 when the page loads in the mobile browser it will display full screen as well as scrolling to hide the location bar. This gives the widget an 'app-like' look and feel as well as allows the user to take advantage of all the screen real estate offered by their device.

Thursday, April 29, 2010

CEA Mobile Widgets Technology Preview

One of the questions that keeps coming up, when people see a demo of the CEA widgets or try them out, is - "Will the widgets work with mobile devices?".

Since mobile devices have their own unique challenges around screen real estate and also touch interactions we have developed new versions of the CEA widgets, Click to call, Call notification and Cobrowse optimized for the iPhone and Android mobile browsers.

Fore more information and to download the updated ceadojo toolkit check out the
Communications Enabled Applications Mobile Widgets Technology Preview

Also if you would like to see the new widgets in action checkout the following video!

Monday, November 16, 2009

CEA widgets now packaged with Dojo 1.3.2

The ceadojo custom build packages the CEA widgets with a specific version of Dojo and eliminates the need to declare the cea module path and "importing" the widget. For the CEA 1.0.0.1 refresh a new version of Dojo 1.3.2 ( previously 1.3.1 ) was pulled in to create the custom build.

This updated version of Dojo now includes official support for:
  • Internet Explorer V8
  • Firefox 3.5
  • Google Chrome 2
Since the CEA widgets already supported these additional browsers this update is valuable for customers that are building pages that utilize the base Dojo functionality from the ceadojo custom build.

iWidget support for CEA widgets

The core CEA widgets, ClickToCall, CallNotification and Cobrowse, can now be easily integrated into frameworks that implement the iWidget specification, for example IBM Mashup Center. These widgets have each been wrapped following the iWidget specification and packaged together in an iWidget Package file (\feature_packs\cea\samples \cea.war ) for easy deployment.


For more general information on iWidgets, please see the IBM Mashup Center wiki.


Friday, November 13, 2009

First refresh of CEA shipped

At this site, you can download the first refresh fix pack of the CEA Feature Pack. Here is a list of what we changed:
  • Clustering and failover support for CEA services on distributed platforms (Web Collaboration and Telephony services)
  • iWidget support for CEA widgets
  • Increased Web Collaboration security
  • New Dojo level supported by the widgets

We'll try to blog in the upcoming weeks about some more details of these features but if you have downloaded the first release of CEA, we highly recommend picking up this fix pack!

Friday, September 18, 2009

Add file transfer capabilities to the CollaborationDialog

The CollaborationDialog widget in the WAS CEA feature pack provides capability that is leveraged during cobrowsing sessions. Part of the function in the widget consists of sending data between the participants in a cobrowse session. This enables function like highlighting, following, and sending a page. It's this, the capability to send data back and forth between participants, that can be leveraged to produce very useful extensions to the base CollaborationDialog widget.

Take for example the previous scenario I blogged about. In that case, a few extensions to some of the CEA widgets provided an enhanced, online communications experience between a customer and an insurance company customer service representative. What if during the course of that communication the policy was updated and the customer service representative wanted to send the new policy to the customer? Well, it could be sent via email and the customer could check it at some later time. However, a simple extension to the CollaborationDialog widget to provide file transfer capabilities will allow the customer service representative to send and the customer to receive the updated policy right away.

To do this we can leverage the CollaborationDialog widget's existing ability to send data back and forth between cobrowse participants. Your first thought may be that we actually use the data sending capability to directly send file contents back and forth, but that's not what the data sending infrastructure was designed for. Rather, it was designed to send small, chatty messages. With that in mind, we use simple AJAX functionality to post a form containing a file attachment to a backend file server. Then, we leverage the data sending infrastructure to notify the other cobrowse participant that they are being sent a file, and we provide the location of that file so it can be downloaded.

We also make some changes to the HTML and CSS files for the CollaborationDialog, and combined with the necessary JavaScript additions mentioned above, we can now choose and send files as seen below:


We can also receive files from our cobrowsing partner:


The capability to send and receive files while in a cobrowse session can significantly enhance the experience of both participants. If you are interested in how you can add this extension into your WAS CEA environment, drop a comment right here and we'll be happy to set you up with some examples.

Friday, September 4, 2009

Extending the Cobrowse widget

I'm still looking at and experimenting with the WebSphere CEA Feature Pack widgets. In my last two posts I took a look at scenarios that lead to extending the WebSphere CEA ClickToCall widget. In my latest project, I took a look at the Cobrowse and CollaborationDialog widgets.

It's clear that there are many scenarios where users would want to employ and maybe even extend these two widgets. For instance, check out the demonstration below for one such scenario.


There are a few things to note about the sample as far as the extensions go. First of all, I did a very simple extension to the ClickToCall widget along the same lines of my previous posts, so I won't go into much detail about that particular piece.

Other than the ClickToCall extension, I extended both the Cobrowse (cea.widget.Cobrowse) and CollaborationDialog (cea.widget.CollaborationDialog) widgets to provide the function you see in the sample. With the Cobrowse widget, I added functionality such that when the customer service representative creates the collaboration link, a resource representing that link and the customer it is intended for is created on the backend. That was easy to do by overriding the Cobrowse widget's _convertToWaitingState method and providing custom function to create the necessary resource.

When a customer logs into the Insurance Company's home page, JavaScript running on the page checks the backend for any resources that would indicate a customer service representative has invited that particular customer to a collaboration session. In the sample video, this is shown when the customers logs into the Insurance Company's site.

Next, I needed to extend the CollaborationDialog widget in a couple of ways. First, I added the Send Policy Data button to the dialog's toolbar. All that was required to add the button was a small update to the widget's JavaScript. No HTML or CSS changes were necessary.

After that, I added a function that allows the customer service representative to send the retrieved policy information from his window to the customer's window. This was done by piggy-backing on the ability of the CollaborationDialog widget to send data back and forth between the collaboration participants. There was a nifty Dojo function that came into play when implementing this capability. Once the data was received by the CollaborationDialog instance on the customer side, the contents of the content pane in the CollaborationDialog needed to be updated. This was done by using dojo.withDoc as seen below:
dojo.withDoc(iframeDoc,
function() {
var data = this.receivedPolicyData;
dojo.style(dojo.byId("policyTable"), "display", "block");
dojo.byId("policyNumText").innerHTML = data['policyNum'];
dojo.byId("policyHolderText").innerHTML = data['policyHolder'];
dojo.byId("policyTypeText").innerHTML = data['policyType'];
dojo.byId("policyAmountText").innerHTML = data['policyAmount'];
dojo.byId("policyPremiumText").innerHTML = data['policyPremium'];
dojo.byId("policyPaymentScheduleText").innerHTML =
data['policyPaymentSchedule'];
dojo.byId("policyDeductibleText").innerHTML =
data['policyDeductible'];
},
this
);
The dojo.withDoc method allowed me to update the DOM of the source HTML page for the content pane, and in this case it was extremely helpful.

The required changes to implement these widget extensions were fairly minimal considering the capabilities that were added. In fact, the backend data services for the various resources used by this sample took most of my time. If you are interested in seeing more of the code for the sample above just drop a reply to this blog post. I'd be happy to share more of the extension implementation.

Tuesday, August 25, 2009

More use cases for CEA widget extension

Just a few days ago I documented my first example with extending the WebSphere CEA click-to-call widget to provide a customized experience between a customer and customer service representative.That experience opened my eyes to the tons of use cases for extending the click-to-call widget (or any of the WebSphere CEA widgets for that matter).

For instance, a growing trend among restaurants is to offer food ordering online. You can go online, place your order, and either have it delivered or pick it up at some later time. So, I thought about the employee back at the restaurant monitoring these orders, and in particular I thought about how they may benefit from embedding communication capabilities in that online ordering system.

Consider my fictional pizza company, The Acme Pizza Company, and the back-end to their online ordering system. The employee back at the restaurant may view a list of the pizza orders and confirm each of those orders for the kitchen team.


When the restaurant employee clicks the Confirm Order it is probably necessary to show more information about the order and the customer who placed the order. But wouldn't it also be nice to allow the restaurant employee to simply click a button to call the customer that placed the order when it was necessary?

An easy extension to the WebSphere CEA click-to-call widget gives us both the information about the order and the embedded communication capabilities that allow the restaurant employee to connect with the customer directly from the web page.


The panel you see above is a simple dijit.Dialog widget that contains an extended version of the cea.widget.ClickToCall widget. The Acme Pizza Company employee has all the information they need to confirm the order, and they can even call the customer directly from the web page if necessary.

The possibilities for extending the WebSphere CEA widgets are endless. I hope to post more scenarios of interest involving different widgets soon. In the meantime, if you're interested in the JavaScript and HTML involved in building up this extension, you can download it here.

Wednesday, August 19, 2009

Extending WebSphere CEA widgets

Since it’s my first time posting here, I guess a quick introduction is in order. My name is Dustin Amrhein and I’m a technical evangelist for emerging technologies (cool stuff) in WebSphere. I do not work on the WebSphere CEA development team, but I have been experimenting with the new CEA Feature Pack for the WebSphere Application Server lately.

The first thing I did after installing the CEA Feature Pack was install and play around with the PlantsByWebSphere sample application that is included in the install. The cool features provided by the CEA Feature Pack, like co-browse, click-to-call, and call notification immediately jump out through the sample.

With the introduction to some of the features of the CEA Feature Pack behind me, I decided to peek under the covers a bit. In particular, I was interested in the Dojo widgets that provided the interface to the functionality on display. If you are familiar with Dojo, you’re well aware that one of the benefits of Dojo widgets is that they can be easily extended to deliver custom function and interfaces. With that in mind, I decided to look into extending one of the widgets delivered by the CEA Feature Pack, the click-to-call widget.

If you look at the Contact Us page of the PlantsByWebSphere, you will see an example of the click-to-call widget:
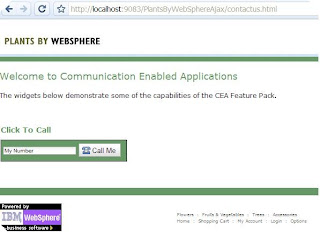


Suppose I wanted to extend this widget just a bit. I want to give my users the option to select from a list of specialist in the different areas of my site (flowers, trees, vegetables, accessories), and once they select a particular specialist I'd like to display information about the person with whom they will be in contact. After all, it's always nice to know who's on the other end!

To do this, I first start by extending the provided cea.widget.ClickToCall JavaScript:

dojo.provide("extension.ClickToCall");
dojo.require('cea.widget.ClickToCall');

dojo.declare("extension.ClickToCall", [ dijit._Widget, dijit._Templated,
cea.widget.ClickToCall ], {

templatePath : dojo.moduleUrl('extension', 'ClickToCall/ClickToCall.html'),
templateString : "",

handleSpecialistSelect : function(item) {
var url = "/proxy/bpp?specialist=" + item;
var responseHandler = dojo.hitch(this, "handleContactResponse");
var errorHandler = dojo.hitch(this, "handleContactError");
dojo.xhrGet( {
url : url,
handleAs : "json",
timeout : 5000,
load : responseHandler,
error : errorHandler
});
},

handleContactResponse : function(response, ioargs) {
this.returnedInfoRow.style.display = "block";
this.callInfoRow.style.display = "block";
this.contactInfoFromGet.innerHTML = "Click the Call Me button to be contacted
by " + response['firstName'] + " " + response['lastName'] + " in "
+ response['city'] + ". Alternatively you may email "
+ response['firstName'] + " at " + response['email'] + ".";
this.widgetNumber = response['phone'];
},

handleContactError : function(response, ioargs) {
console.error("error getting contact info " + response + " status " +
ioArgs.xhr.status);
}
});

The above contains the dojo declaration of my custom widget that extends the existing cea.widget.ClickToCall. The handleSpecialistSelect above will send an HTTP GET request when a user selects the particular type of specialist with whom they wish to talk. In my case, the GET request is sent to an Ajax proxy that then forwards the request for contact information along to the appropriate service. This allows us to use data in our JavaScript that is provided by a service in a different domain. The handleContactResponse populates the page with the contact information returned from the GET request.

The JavaScript above also references a new HTML template via the templatePath variable. The new template can be seen here:
<div>
<table class="clickToCallWidget">
<tr id="contactInfoRow">
<td>
<table>
<tr dojoAttachPoint="getContactRow">
<td>I want to contact a
<select
dojoType="dijit.form.ComboBox"
dojoAttachEvent="onChange:handleSpecialistSelect" id="specialist"
name="specialist">
<option value="none">-- Make Selection --</option>
<option value="flowers">Flowers Specialist</option>
<option value="trees">Trees Specialist</option>
<option value="vegetables">Vegetables Specialist</option>
<option value="accessories">Accessories Specialist</option>
</select></td>
</tr>
<tr dojoAttachPoint="returnedInfoRow" style="display: hidden">
<td><span dojoAttachPoint="contactInfoFromGet"></span></td>
</tr>
</table>
</td>
</tr>
<tr dojoAttachPoint="callInfoRow" style="display: none">
<td>
<table dojoAttachPoint="callInfoTable">
<tr>
<td><label dojoAttachPoint="phoneNumberLabel"
title="${myNumberString}"><input name="phoneNumber"
dojoType="dijit.form.TextBox" dojoAttachPoint="phoneNumber"
class="clickToCallWidgetTextBox" value="${myNumberString}"></input></label>
</td>
<td>
<button dojoType="dijit.form.Button" dojoAttachEvent="onClick:call"
dojoAttachPoint="callButton"
iconClass="clickToCallWidgetIcon clickToCallWidgetCallIcon"
class="clickToCallWidgetButton">${callButtonString}
</button>
</td>
<td>
<button dojoType="dijit.form.Button"
dojoAttachEvent="onClick:hangup" dojoAttachPoint="hangupButton"
iconClass="clickToCallWidgetIcon clickToCallWidgetEndCallIcon"
class="clickToCallWidgetButton" style="display: none">${hangupButtonString}
</button>
</td>
<td>
<button dojoType="dijit.form.Button"
dojoAttachEvent="onClick:cobrowse" dojoAttachPoint="cobrowseButton"
iconClass="clickToCallWidgetIcon clickToCallWidgetCollaborateIcon"
class="clickToCallWidgetButton" style="display: none">${cobrowseButtonString}
</button>
</td>

</tr>
<tr>
<td colspan="4" dojoAttachPoint="status" class="clickToCallWidgetStatus" style="display: none">
</td>
</tr>
</table>
</td>
</tr>
</table>
<div dojoAttachPoint="collaborationDialog"
dojoType="cea.widget.CollaborationDialog"
canControlCollaboration="${canControlCollaboration}"
defaultCollaborationUri="${defaultCollaborationUri}"
highlightElementList="${highlightElementList}"
isHighlightableCallback="${isHighlightableCallback}"
isClickableCallback="${isClickableCallback}">
</div>
</div>
To get my extended click-to-call widget in the PlantsByWebSphere sample application I need to do a couple of things. First I need to add my new files to the application. I'll add them in the PlantsByWebSphere.war file within the PlantsByWebSphere.ear. Relative to the root of the WAR file, I'm adding the following:
  • /ceadojo/cea/extension/ClickToCall.js (JavaScript file above)

  • /ceadojo/cea/extension/ClickToCall/ClickToCall.html (HTML above)
I'm also going to modify the contactus.html at the root level of the PlantsByWebSphere.war to use my custom widget instead of the normal one. To accomplish this, I first add the following to the HTML head section:
<script type="text/javascript">
ceadojo.registerModulePath("extension","../cea/extension");
ceadojo.require("extension.ClickToCall");
ceadojo.require("dojo.parser");
</script>
After that is taken care of, I change the value of the ceadojoType attribute. Before it referenced the cea.widget.ClickToCall widget shipped with the CEA Feature Pack. As seen below, I change the ceadojoType attribute's value to extension.ClickToCall.

<TD>
<h2>Click To Call</h2>
<div id="clickToCallWidget">
<!-- Replace 'CSR@localhost' with the user and address to be contacted when a clickToCall call is initiated -->
<div ceadojoType="extension.ClickToCall" widgetNumber="sip:CSR@localhost" enableCollaboration="true"
canControlCollaboration="true" defaultCollaborationUri="index.html">
</div>
</TD>

Now I'm ready to test out my changes. When I visit the contactus.html page, I'm greeted by a different view:
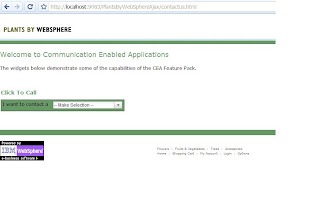
Once I select a particular specialist I want to contact, I then see information about the person who will be contacting me:
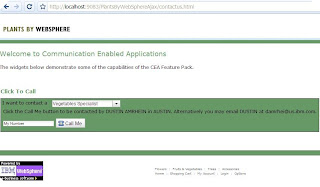

This is just one example of how the widgets provided by the WebSphere CEA Feature Pack can be extended to deliver customized function and behavior. I hope this helps give you a glimpse into the basic pattern for customizing the WebSphere CEA widgets. By the way, you can download a PDF of the JavaScript and HTML displayed above here.
Tuesday, August 4, 2009

Creating a Basic Two Way Form

We had a brief description of the Two Way Forms feature back in May and since then we've gotten a lot of great feedback. I'd like to expand on that and show the steps necessary to augment an existing dojo dijit style form to create a Two Way Form.

Here is a very simple dojo dijit style form with a single text field
<html>
<head>
<script type="text/javascript" src="/PlantsByWebSphereAjax/dojo/dojo.js"
djconfig="parseOnLoad: true, isDebug: false"></script>

<script type="text/javascript">
dojo.require("dijit.form.TextBox");
dojo.require("dojo.parser");
</script>
<style>
@import "/PlantsByWebSphereAjax/dijit/themes/tundra/tundra.css";
</style>
</head>

<body class="tundra">
<form method="post" action="/PlantsByWebSphereAjax/myAction">
<table border="0" cellpadding="0" cellspacing="5" width="100%">
<tr>
<td><label for="fullName">Full Name</label></td>
<td><input id="fullName" type="text" name="fullName" class="medium" dojoType="dijit.form.TextBox"/></td>
</tr>
<tr>
<td><input type="button" name="submit" value="Submit" alt="Submit"></td>
</tr>
</table>
</form>
</body>
</html>

1. The first step when creating a Two Way Form is to replace the existing javascript import with one pointing to ceadojo, the ceadojo toolkit must first be copied to the application from the WAS install.
 <script type="text/javascript" src="/PlantsByWebSphereAjax/ceadojo/dojo/dojo.js"
2. Next you need to replace dojo.require statements with ceadojo.require.
 ceadojo.require("dijit.form.TextBox");
ceadojo.require("dojo.parser");
3. Then replace dojoType with ceadojoType for the input element.
 <input id="fullName" type="text" name="fullName" class="medium" ceadojoType="dijit.form.TextBox"/>
These first three steps update the form to use the ceadojo toolkit that is included in the CEA Feature Pack. Since the Two Way Form interacts with the other CEA widgets to send and receive the notifications its is required that they all use the same version of dojo.

4. Next add the CSS import for the Two Way Form's style
<style>
@import "/PlantsByWebSphereAjax/ceadojo/dijit/themes/tundra/tundra.css";
@import "/PlantsByWebSphereAjax/ceadojo/cea/widget/TwoWayForm/TwoWayForm.css";
</style>
5. Finally add ceadojoType="cea.widget.TwoWayForm" to the form element
<form method="post" action="/PlantsByWebSphereAjax/myAction" ceadojoType="cea.widget.TwoWayForm">
With these five changes you have created the most basic Two Way Form. At this point both the reader and writer will have access to modify the field.

Lets take it a step further. For this scenario we only want the writer to have access to modify the field. By setting the ceaCollabWriteAccess attribute we can make the field read-only for one of the peers.
<input id="fullName" type="text" name="fullName" class="medium" ceadojoType="dijit.form.TextBox" ceaCollabWriteAccess="writer"/>
Note: The roles of reader and writer are determined by who has collaboration control when the Two Way Form is launched. The active user will be the writer and the passive user the reader.

Two Way Forms also offer the ability to perform field validation and data masking for more information on these two topics please check out the Infocenter.

One of the questions that keeps coming up is whether a Two Way Form can be used outside of the Contact center cobrowsing and Peer to peer cobrowsing scenarios. The answer is yes. This works because when the Two Way Form is loaded it checks to see if its being used in a collaboration session and if not the additional attributes are ignored.

This gives you the ability to augment an existing form and only have one copy that can be used for both the single user scenario and the collaborative scenarios offered thru the CEA widgets.

Monday, July 13, 2009

Handling personalized actions in a cobrowsing session

Another scenario to consider with commerce applications is personalized actions for example "Add to Cart", "Add to wishlist" and "Checkout" buttons. In a cobrowsing session it may make sense to block a user from sharing those actions when "Follow-Me' mode is enabled. This way one user adding an item to their shopping cart will not cause the peer to also add the item. This can be accomplished by writing a callback function and then specifying the function name for the isClickableCallback attribute of the CEA widgets:
<div ceadojoType="cea.widget.Cobrowse" joinCollaborationURI="PlantsByWebSphereAjax/cobrowse.html" defaultCollaborationUri="PlantsByWebSphereAjax/index.html" isClickableCallback="cobrowseClickable"></div>
This callback function will be called each time the passive user receives a "Follow me" event from the peer. If the function returns true the information is processed and the click is performed. If the function returns false a warning message is displayed informing the user that the peer's action can not be followed.

The callback function is passed the HTML element that will be clicked and must return a boolean, the application developer can use a number of approaches to determine if the element is clickable . For example in the sample code below we want to disallow the user from clicking the "Add to cart" button:
function cobrowseClickable(node) {
// Summary: Callback function to allow the application to
// determine if a specific node click should be sent to the peer
if (node.innerHTML == "Add to cart" || node.alt == "Add to Cart"){
return false;
}
return true;
}
In this example the code checks if either the button text or alt text matches "Add to cart" and if so returns false to denote that this element can not be clicked. For all other elements it returns true.


Friday, July 10, 2009

Handling personalized content in a cobrowsing session

In commerce applications a page may contain personalized content for example a user's shopping cart or a targeted product recommendation.

When two users are cobrowsing using the CEA widgets the personalized sections of the page may be completely different. In this scenario it makes sense to block the users from highlighting the personalized content. This will minimize the chance of a user trying to highlight and draw attention to content that is not shown on the peer user's page.

This can be done by writing a callback function and then specifying the function name for the isHighlightableCallback attribute of the CEA widgets:
<div ceadojoType="cea.widget.Cobrowse" joinCollaborationURI="PlantsByWebSphereAjax/cobrowse.html" defaultCollaborationUri="index.html" isHighlightableCallback="cobrowseHighlightable"></div>
This callback function will be called each time a user mouses over a HTML element after clicking the highlight button. If the function returns true the element's style will be updated to show that it can be highlighted. If it returns false no change is made. If the user attempts to click on an element that is not highlightable a warning message will be displayed.

The callback function is passed in the current HTML element and must return a boolean, beyond that the application developer has the freedom to decide how to determine if an element is highlightable . For example in the sample code below we want to disallow the user from highlighting the shopping cart:
function cobrowseHighlightable(node) {
// Summary: Callback function to allow the application
// to determine if a specific node is highlightable
if (node.id == "ibm_widget_HtmlShoppingCart_0"){
return false;
} else {
//If this is not the shopping cart then use the default logic
// to make sure its a highlight element
var highlightElementArray = ["DIV","SPAN","TR","TH","TD","P"];
var isHighlightableElement = false;
for (var i=0; i

This example uses the node.id to determine that the element is the shopping cart and then returns false so that it will not be highlighted.

One other note is that specifying the callback function overrides the default processing of the highlightElementList. The highlightElementList is used to determine what HTML elements can be highlighted. The sample code above shows how to add this logic if needed for your callback.


Thursday, July 9, 2009

Web communications enhancing interactions

One of the common questions as people are learning about our WebSphere Communications Enabled Applications (CEA) function is if we are trying to replace interactions with "real people" when they see features such as the cobrowsing. The real idea behind CEA is using an interactions via the web to enhance real time communications which could be phone calls or instant messaging. There are several scenarios that we try to show in the demo video below, but here are some of the common issues that a web based interaction could solve in a contact center:

Click to Call:
  • Increase efficiency by removing the need for people to type in phone numbers they see on a web site.
  • Help a user connect to the most relevant help based on what page they are on without having to traverse a voice based menu system.
  • Provide the backend contact center with relevant user information from their web session.

Contact Center Cobrowsing
  • Help explain complex data to customers which may be too difficult to describe. Some examples include mortgage closing costs, insurance policy details, order information, financial transaction details, or product information. Customers could print or save the information which could result in them not having to transcribe what the contact center representative is saying.
  • Teach a customer how to use a specific site rather than just telling them an answer so that they may not need to call again for a similar issue.

Two way forms
  • Allows a customer to visually verify information rather than waiting for the contact center representative to repeat it. For example, a misspelled last name can take time, cause problems looking up information in the future, and decrease customer satisfaction. Two way forms allows the customer to visually verify what the contact center representative has entered.
  • Either party in the session could fill out some fields which, if it makes more sense for the customer to do it, can increase efficiency.
  • Some vital data like Social Security Numbers or Account/Credit Card numbers could be entered by the customer and obfuscated to the contact center representative reducing the risk of critical information being misused.


All of these scenarios are in the context of a real time communications session like a phone call. Here is a demo we have shown in the past showing these features in a contact center scenario. Download the beta now from the link on the right hand column and try the application shown below yourself.

Wednesday, July 1, 2009

Adding a CEA widget to a page already using Dojo

The Dojo Toolkit, starting in version 1.1, offers the ability to use multiple versions of Dojo in the same page. This feature comes in handy when users want to experiment with a new version of Dojo or when using a custom namespaced library like the one shipped with the CEA Feature Pack. For a detailed description of how using multiple Dojo versions works please see this dojotoolkit article.

To enable users to utilize a previous version of Dojo, we provide a custom namespaced library called ceadojo and all of the components you need to embed the CEA widgets with their own dojo version. This custom namespaced library has baked-in a djConfig.scopeMap to map dojo, dijit and dojox to ceadojo, ceadijit and ceadojox respectively. This essentially allows a user to embed the CEA widgets and keep them isolated from an existing version of Dojo running on the page.

In the last two posts I covered how to embed the CEA widgets on a page that is not already using a Dojo Toolkit. This next example shows the updated steps to import ceadojo when your application is already using a Dojo Toolkit.

Here is an example of the existing script tag to include your version of Dojo for the page.
<script type="text/javascript" src="./dojo/dojo.js"
djconfig="parseOnLoad: true, isDebug: false"></script>
Widgets using this toolkit will use "dojoType" to define a widget. Typically this is the way that pages using Dojo instantiate a widget, so when embedding a CEA widget no changes are necessary to the widgets already placed on the page.

The next script tag is used to redefine djConfig to allow proper loading of the ceadojo NLS files.
<script type="text/javascript">
var djConfig = { baseUrl:"./ceadojo/dojo/" };
</script>
The final step is to import the ceadojo toolkit for use on the page. The CEA widgets are defined using "ceaDojoType".
<script type="text/javascript" src="./ceadojo/dojo/dojo.js"></script>
The HTML for importing the CSS and placing the widget on the page remain the same as the exanples in the last two posts.


Embedding the CEA Peer to Peer Cobrowsing Widget

The first step when embedding any of the CEA widgets into your application is to copy the ceadojo directory ( <washome>\feature_packs\cea\javascript\ceadojo ) into your application.

Based on where you copied the ceadojo directory you will need to use that path when pointing to the various JavaScript and CSS files. For this post I will assume that I've copied the ceadojo directory directly under the context root and the HTML file that I am adding the widget to is at the same path.

For the
Peer to peer cobrowsing widget we need to import the following CSS files:
<style type="text/css">
@import "./ceadojo/dijit/themes/tundra/tundra.css";

@import "./ceadojo/cea/widget/Cobrowse/Cobrowse.css";

@import "./ceadojo/cea/widget/CollaborationDialog/CollaborationDialog.css";

</style>

The next step is to import the CEA widget toolkit. Importing the CEA widget toolkit is just like importing any other Dojo toolkit.

<script type="text/javascript" src="./ceadojo/dojo/dojo.js" djConfig="parseOnLoad: true, isDebug: false"></script>
The CEA widgets are built on top of Dojo's Tundra theme. So next we need to add this theme to the body:
<body class="tundra">
And finally the last step is to place the CEA widget on the page. The following HTML code snippet will place the Peer to peer cobrowsing widget on the page:
<div ceadojoType="cea.widget.Cobrowse" joinCollaborationURI="PlantsByWebSphereAjax/cobrowse.html" defaultCollaborationUri="index.html" ></div>
There are a few additional attributes that need to be configured for Peer to peer cobrowsing.
  • joinCollaborationURI is used by the Peer to peer cobrowsing widget to generate the invitation link that can be sent to the peer.
    This needs to be a link to a page that contains the Peer to peer cobrowsing widget and can accept an additional request paramater. Commonly this will be a link to the current page you are adding the widget to or a specific page created with instructions detailing how to use Peer to peer cobrowsing. For example in the plants sample we used the same page we added the widget to
    "/PlantsByWebSphereAjax/cobrowse.html"
  • defaultCollaborationUri specifies what page to load first when Peer to peer cobrowsing is started. For example in the Plants sample we used "/PlantsByWebSphereAjax/index.html"

Friday, June 5, 2009

Embedding the CEA Telephony Widgets

The first step when embedding any of the CEA widgets into your application is to copy the ceadojo directory ( <washome>\feature_packs\cea\javascript\ceadojo ) into your application.

Based on where you copied the ceadojo directory you will need to use that path when pointing to the various JavaScript and CSS files. For this post I will assume that I've copied the ceadojo directory directly under the context root and the HTML file that I am adding the widget to is at the same path.

For the Click to call widget we need to import the following CSS files:
<style type="text/css">
@import "./ceadojo/dijit/themes/tundra/tundra.css";

@import "./ceadojo/cea/widget/ClickToCall/ClickToCall.css";

@import "./ceadojo/cea/widget/CollaborationDialog/CollaborationDialog.css";

</style>
The CSS imports for the Call notification widget are the same just replace ClickToCall/ClickToCall.css with CallNotification/CallNotification.css.

The next step is to import the CEA widget toolkit. Importing the CEA widget toolkit is just like importing any other Dojo toolkit.
This step is the same for both telephony widgets. ( Note: I will cover the steps to import ceadojo on a page already using Dojo in a later post )
<script type="text/javascript" src="./ceadojo/dojo/dojo.js" djConfig="parseOnLoad: true, isDebug: false"></script>
The CEA widgets are built on top of Dojo's Tundra theme. So next we need to add this theme to the body:
<body class="tundra">
And finally the last step is to place the CEA widget on the page. The following HTML code snippet will place the Click to call widget on the page:
<div ceadojoType="cea.widget.ClickToCall" widgetNumber="xxx-xxx-xxxx" enableCollaboration="true" canControlCollaboration="true" defaultCollaborationUri="cobrowseWelcome.html"></div>
There are a few additional attributes that need to be configured for Click to call.
  • widgetNumber is used by the Click to call widget to determine what number to call.
  • enableCollaboration determines whether this widget will be made available for Contact center cobrowsing. If Contact center cobrowsing is enabled you should also configure the next two attributes
  • canControlCollaboration determines whether this widget will be able to drive the collaboration session
  • defaultCollaborationUri specifies what page to load first when the Contact center cobrowsing is started.
The following HTML code snippet will place the Call notification widget on the page:
<div ceadojoType="cea.widget.CallNotification" enableCollaboration="true" canControlCollaboration="true" defaultCollaborationUri="index.html"></div>
For the Call notification widget the same attributes apply, however "widgetNumber" is an optional attribute that determines what number to monitor for incoming calls. If not specified the user will be presented with a textfield to enter the number.

Embedding the CEA widgets in your application

In Erik's post "Widgets in the CEA Feature Pack" he gave a high level overview of some of the widgets that are included in the CEA Feature Pack. I'd like to take it step further in the next few posts and discuss how easy it is to embed each of these widgets in your application.

If you had a chance to check out our widgets in the Open Beta you will notice that the steps to embed the widgets have gotten simplier. This is all thanks to the ceadojo custom build that was shipped with the Beta refresh. This custom build packages the CEA widgets with a specific version of Dojo and eliminates the need to declare the cea module path and "importing" the widget.

Friday, May 15, 2009

Extending the CEA Cobrowsing feature

The widgets in our Communications Enabled Applications Feature Pack are very extendable. When we first created it, we thought of many ways to extend those widgets. Below is one example I have...


In that video, I talked about adding basic instant messaging to the cobrowsing window. Inserted in that interview was a recorded usage of our WebSphere Commerce sample we showed at Impact where our WebSphere Commerce team integrated the CEA cobrowsing functionality into their sample store and then extended the cobrowsing Web 2.0 widget with instant messaging support. For a javascript developer, adding this function on top of our existing cobrowsing function would take just a couple of days.

Over time on our blog here we plan to post descriptions and sample code as to how you would do these sorts of extensions to help further a rich communications experience over multiple modalities. For now, if you have some great ideas on what else we could be adding into the cobrowsing scenario please comment here, tweet @burckart, or send me an email to ejburcka at us dot ibm dot com. We will consider these for future blogs or releases!

Friday, May 1, 2009

Widgets in the CEA Feature Pack

Here is a quick rundown of some of the Web 2.0 widgets in our CEA Feature Pack:


Click to call- the ability to send a message into our REST service for it to make a phone call between two parties. This widget needs two phone numbers, one for the callee and one for the caller. The caller can be specified by the user of the widget and the callee can be embedded. The widget could also be easily extended to pull the caller information from another source.


Call Notifications - the ability communicate with our REST service to monitor a phone for caller ID type information. This widget needs the phone number to monitor, which could have been entered or pushed through an extension to the javascript.

Collaboration Dialog - this is a modal window which controls the sharing of information between two peers. There are some basic send and receive event semantics around this widget that allow extensions to send and receive various pieces of data.


Contact Center Cobrowsing - when a caller enters through our click to call widget and the callee enters through the call notification widget, the two users are able to launch a collaboration dialog that has the ability to have a controlled browsing session between the two peer users. This is described and demonstrated in detail in the video above.


Peer to Peer cobrowsing - has the ability to create a link which allows two users to enter a cobrowsing session without being involved with the telephony widgets. One user creates the link and sends it to the other via some method such as instant messaging or email. Since this link is created via a REST service, there could be some intelligence in a site which includes this sort of interaction without the widgets involved. Once the link is entered on the peer user's side, the two users can enter a collaborative cobrowsing session.


Two Way Forms - allows you to take a dojo dijit style form and augment it to have a writer and reader side on various fields. This is handy when one side must review the correctness of the data the other side is entering. The video above shows this flow even more.