Showing posts with label Telephony. Show all posts

Wednesday, August 12, 2009

Communications Enabled Applications Vendor Interoperability

With so much buzz around the release of the Communications Enabled Applications 1.0.0.0 feature pack I would like to highlight the vendors that we worked closely with to ensure product interoperability.

Below is a listing of each vendor and PBX version used in our testing.

Avaya:
Application Enablement Services
Version: r4-2-1-20-5-0
Server Type: DELL1950
Offer Type: TURNKEY


Cisco:
Cisco Unified CM Administration
System version: 7.0.1.11000-2
Cisco Unified Presence Administration
System version: 7.0.2.10000-36


Nortel:
Nortel Communication Server 1000E CPPM
Version: 4021
Release: 550J

I would like to thank Avaya, Cisco, and Nortel for their support in helping us ensure our product worked seamlessly with their specific PBX solution.

Wednesday, August 5, 2009

How to configure WAS CEA to use Avaya AES 4.2

We are proud to announce that Avaya's PBX solution, Application Enablement Server (AES) version 4.2, passed all initial interoperability tests with CEA 1.0.0.0. We are successfully able to control various telephony endpoints configured on the AES directly from our CEA 1.0.0.0 enabled application. As with most interoperability tests, there were a few issues that were exposed that had to be addressed. This blog post will serve as an early warning to the greater community of how to get around a major issue we found when inter oping with AES 4.2.

The Avaya AES 4.2 only supports the TLS transport for receiving TR/87 requests. This prerequisite is fine as CEA supports sending requests over UDP, TCP, or TLS transports. However, there is a problem where AES 4.2 does not support "sips:" over the TLS transport. This is a bug in their code and they are working to fix this in a subsequent release. In the mean time, a work around has been crafted to circumvent this issue.

By default, the Websphere Application Server (WAS) has UDP, TCP, and TLS defined as available transports to send data across the network. When CEA 1.0.0.0 constructs a request outbound to a PBX over UDP or TCP it uses the "sip:" construct in the request. This typically denotes that the request is not secured when its sent out over the network.

Example:

Invite Request: INVITE sip:+19194863101@subzero.rtp.raleigh.ibm.com:4723;user=phone;transport=tcp SIP/2.0
From: sip:ibmtest1@9.42.92.132;tag=5109292067337619_local.1249402695153_2_1
To:
Call-ID: 5620596434574489@9.42.92.132
Max-Forwards: 70
CSeq: 2 INVITE
Content-Type: application/csta+xml
Content-Length: 362

However, if you delete a transport channel, WAS will only utilize the remaining transports to send data. We will use this behavior to our advantage.

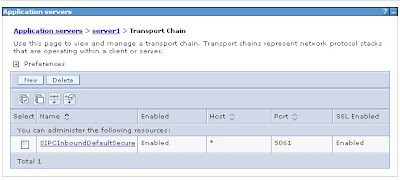
What we want do is delete the UDP and TCP transport thus only leaving the TLS transport available to send CEA traffic. You can do this by browsing to Application Servers --> Server Name --> Transport chains. You should see a menu like the one presented below.


Select and Delete the SIPCInboundDefault and the SIPInboundDefaultUDP . This will leave you with the SIPCInboundDefaultSecure (TLS Chain).


On the CEA configuration panel where you specify the host, port, and transport of your Avaya AES, you will specify TCP as the outbound transport.
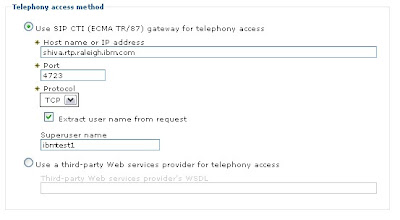


By doing this, the CEA application will construct its outbound request to the AES server using the "sip:" construct. Normally, CEA would attempt to send out the TR/87 request to the AES over the TCP transport you defined on the panel, but since only the TLS transport is available, its forces WAS to send the TCP formatted request over the TLS transport.


Thus, you get a "sip:" constructed request over a TLS transport. This is exactly what the Avaya AES supports.

Example:

Invite Request: INVITE sips:+19194863101@subzero.rtp.raleigh.ibm.com:4723;user=phone;transport=tls SIP/2.0
From: sip:ibmtest1@9.42.92.132;tag=5109292067337619_local.1249402695153_2_1
To:
Call-ID: 5620596434574489@9.42.92.132
Max-Forwards: 70
CSeq: 2 INVITE
Content-Type: application/csta+xml
Content-Length: 362

Friday, July 31, 2009

CEA Packs a Punch with PBX Interoperability

CEA 1.0.0.0 now gives system administrators the ability to extend their telephony and J2EE architecture to include 3rd party SIP-CTI enabled PBXs. This feature strategically allows IT environments running WebSphere Application Server (WAS) the flexibility to extend their current applications to include features and functionality supplied through the WebSphere implementation of the SIP-CTI (ECMA TR/87) API.


From an interoperability standpoint, we attempted to make the setup and configuration of an external PBX as painless as possible. We’ve created a panel that will require you to specify the hostname, port, and protocol of the SIP CTI (ECMA TR/87) Gateway. Also, if your gateway supports this, you can specify a “superuser” that will be solely utilized to authenticate and authorize outbound calls through the gateway. Conversely, if your PBX does not support the use of a “superuser”, an application developer has the option of extracting the username from the request and using it to authenticate and authorize the outbound call.


For those out there who do not have access to their PBX, we’ve also included a sample PBX application which can be deployed on stand alone appserver. Although this application is for test purposes only, this sample PBX will allow a customer to get a feel as to how to deploy and test applications that interact with a virtual SIP CTI enabled PBX.


It’s our hope that you take action in deploying and consuming all of the new features made available in the CEA feature pack. In future posts, I will be blogging about some of the technical nuances that you should be mindful of when deploying a CEA solution with specific vendor PBXs.

Interoperability with major vendors


One of the things that we believe makes WebSphere CEA unique and ready for our customer's environments is that we partner with and test our solution with major vendors like Avaya and Cisco. These partners have helped us to create a solution that is ready for customer deployments. In the next couple of weeks, our lead interoperability engineer, James Hales, will be talking about how some of this works. I talked James into doing the above spoof video to introduce the set of blogs about testing and interoperability.

Friday, June 5, 2009

Embedding the CEA Telephony Widgets

The first step when embedding any of the CEA widgets into your application is to copy the ceadojo directory ( <washome>\feature_packs\cea\javascript\ceadojo ) into your application.

Based on where you copied the ceadojo directory you will need to use that path when pointing to the various JavaScript and CSS files. For this post I will assume that I've copied the ceadojo directory directly under the context root and the HTML file that I am adding the widget to is at the same path.

For the Click to call widget we need to import the following CSS files:
<style type="text/css">
@import "./ceadojo/dijit/themes/tundra/tundra.css";

@import "./ceadojo/cea/widget/ClickToCall/ClickToCall.css";

@import "./ceadojo/cea/widget/CollaborationDialog/CollaborationDialog.css";

</style>
The CSS imports for the Call notification widget are the same just replace ClickToCall/ClickToCall.css with CallNotification/CallNotification.css.

The next step is to import the CEA widget toolkit. Importing the CEA widget toolkit is just like importing any other Dojo toolkit.
This step is the same for both telephony widgets. ( Note: I will cover the steps to import ceadojo on a page already using Dojo in a later post )
<script type="text/javascript" src="./ceadojo/dojo/dojo.js" djConfig="parseOnLoad: true, isDebug: false"></script>
The CEA widgets are built on top of Dojo's Tundra theme. So next we need to add this theme to the body:
<body class="tundra">
And finally the last step is to place the CEA widget on the page. The following HTML code snippet will place the Click to call widget on the page:
<div ceadojoType="cea.widget.ClickToCall" widgetNumber="xxx-xxx-xxxx" enableCollaboration="true" canControlCollaboration="true" defaultCollaborationUri="cobrowseWelcome.html"></div>
There are a few additional attributes that need to be configured for Click to call.
  • widgetNumber is used by the Click to call widget to determine what number to call.
  • enableCollaboration determines whether this widget will be made available for Contact center cobrowsing. If Contact center cobrowsing is enabled you should also configure the next two attributes
  • canControlCollaboration determines whether this widget will be able to drive the collaboration session
  • defaultCollaborationUri specifies what page to load first when the Contact center cobrowsing is started.
The following HTML code snippet will place the Call notification widget on the page:
<div ceadojoType="cea.widget.CallNotification" enableCollaboration="true" canControlCollaboration="true" defaultCollaborationUri="index.html"></div>
For the Call notification widget the same attributes apply, however "widgetNumber" is an optional attribute that determines what number to monitor for incoming calls. If not specified the user will be presented with a textfield to enter the number.