Since it’s my first time posting here, I guess a quick introduction is in order. My name is Dustin Amrhein and I’m a technical evangelist for emerging technologies (cool stuff) in WebSphere. I do not work on the WebSphere CEA development team, but I have been experimenting with the new CEA Feature Pack for the WebSphere Application Server lately.
The first thing I did after installing the CEA Feature Pack was install and play around with the PlantsByWebSphere sample application that is included in the install. The cool features provided by the CEA Feature Pack, like co-browse, click-to-call, and call notification immediately jump out through the sample.
With the introduction to some of the features of the CEA Feature Pack behind me, I decided to peek under the covers a bit. In particular, I was interested in the Dojo widgets that provided the interface to the functionality on display. If you are familiar with Dojo, you’re well aware that one of the benefits of Dojo widgets is that they can be easily extended to deliver custom function and interfaces. With that in mind, I decided to look into extending one of the widgets delivered by the CEA Feature Pack, the click-to-call widget.
If you look at the
Contact Us page of the PlantsByWebSphere, you will see an example of the click-to-call widget:
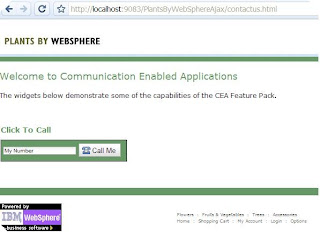
Suppose I wanted to extend this widget just a bit. I want to give my users the option to select from a list of specialist in the different areas of my site (flowers, trees, vegetables, accessories), and once they select a particular specialist I'd like to display information about the person with whom they will be in contact. After all, it's always nice to know who's on the other end!
To do this, I first start by extending the provided cea.widget.ClickToCall JavaScript:
dojo.provide("extension.ClickToCall");
dojo.require('cea.widget.ClickToCall');

dojo.declare("extension.ClickToCall", [ dijit._Widget, dijit._Templated,
  cea.widget.ClickToCall ], {

templatePath : dojo.moduleUrl('extension', 'ClickToCall/ClickToCall.html'),
templateString : "",

handleSpecialistSelect : function(item) {
 var url = "/proxy/bpp?specialist=" + item;
 var responseHandler = dojo.hitch(this, "handleContactResponse");
 var errorHandler = dojo.hitch(this, "handleContactError");
 dojo.xhrGet( {
    url : url,
  handleAs : "json",
  timeout : 5000,
  load : responseHandler,
  error : errorHandler
 });
},

handleContactResponse : function(response, ioargs) {
 this.returnedInfoRow.style.display = "block";
 this.callInfoRow.style.display = "block";
 this.contactInfoFromGet.innerHTML = "Click the Call Me button to be contacted
    by " + response['firstName'] + " " + response['lastName'] + " in "
  + response['city'] + ". Alternatively you may email "
  + response['firstName'] + " at " + response['email'] + ".";
  this.widgetNumber = response['phone'];
},

handleContactError : function(response, ioargs) {
 console.error("error getting contact info " + response + " status " +
    ioArgs.xhr.status);
}
});
The above contains the dojo declaration of my custom widget that extends the existing cea.widget.ClickToCall. The
handleSpecialistSelect above will send an HTTP GET request when a user selects the particular type of specialist with whom they wish to talk. In my case, the GET request is sent to an Ajax proxy that then forwards the request for contact information along to the appropriate service. This allows us to use data in our JavaScript that is provided by a service in a different domain. The
handleContactResponse populates the page with the contact information returned from the GET request.
The JavaScript above also references a new HTML template via the
templatePath variable. The new template can be seen here:
<div>
<table class="clickToCallWidget">
  <tr id="contactInfoRow">
     <td>
        <table>
           <tr dojoAttachPoint="getContactRow">
              <td>I want to contact a
               <select
                   dojoType="dijit.form.ComboBox"
                   dojoAttachEvent="onChange:handleSpecialistSelect" id="specialist"
                   name="specialist">
                   <option value="none">-- Make Selection --</option>
                   <option value="flowers">Flowers Specialist</option>
                   <option value="trees">Trees Specialist</option>
                   <option value="vegetables">Vegetables Specialist</option>
                   <option value="accessories">Accessories Specialist</option>
               </select></td>
           </tr>
           <tr dojoAttachPoint="returnedInfoRow" style="display: hidden">
              <td><span dojoAttachPoint="contactInfoFromGet"></span></td>
           </tr>
        </table>
      </td>
   </tr>
   <tr dojoAttachPoint="callInfoRow" style="display: none">
      <td>
         <table dojoAttachPoint="callInfoTable">
            <tr>
               <td><label dojoAttachPoint="phoneNumberLabel"
                  title="${myNumberString}"><input name="phoneNumber"
                  dojoType="dijit.form.TextBox" dojoAttachPoint="phoneNumber"
                  class="clickToCallWidgetTextBox" value="${myNumberString}"></input></label>
               </td>
               <td>
                  <button dojoType="dijit.form.Button" dojoAttachEvent="onClick:call"
                   dojoAttachPoint="callButton"
                   iconClass="clickToCallWidgetIcon clickToCallWidgetCallIcon"
                   class="clickToCallWidgetButton">${callButtonString}
                  </button>
               </td>
               <td>
                  <button dojoType="dijit.form.Button"
                   dojoAttachEvent="onClick:hangup" dojoAttachPoint="hangupButton"
                   iconClass="clickToCallWidgetIcon clickToCallWidgetEndCallIcon"
                   class="clickToCallWidgetButton" style="display: none">${hangupButtonString}
                  </button>
               </td>
               <td>
                  <button dojoType="dijit.form.Button"
                   dojoAttachEvent="onClick:cobrowse" dojoAttachPoint="cobrowseButton"
                   iconClass="clickToCallWidgetIcon clickToCallWidgetCollaborateIcon"
                   class="clickToCallWidgetButton" style="display: none">${cobrowseButtonString}
                  </button>
               </td>

            </tr>
            <tr>
               <td colspan="4" dojoAttachPoint="status" class="clickToCallWidgetStatus" style="display: none">
               </td>
            </tr>
         </table>
      </td>
   </tr>
</table>
<div dojoAttachPoint="collaborationDialog"
   dojoType="cea.widget.CollaborationDialog"
   canControlCollaboration="${canControlCollaboration}"
   defaultCollaborationUri="${defaultCollaborationUri}"
   highlightElementList="${highlightElementList}"
   isHighlightableCallback="${isHighlightableCallback}"
   isClickableCallback="${isClickableCallback}">
</div>
</div>
To get my extended click-to-call widget in the PlantsByWebSphere sample application I need to do a couple of things. First I need to add my new files to the application. I'll add them in the PlantsByWebSphere.war file within the PlantsByWebSphere.ear. Relative to the root of the WAR file, I'm adding the following:
- /ceadojo/cea/extension/ClickToCall.js (JavaScript file above)
- /ceadojo/cea/extension/ClickToCall/ClickToCall.html (HTML above)
I'm also going to modify the contactus.html at the root level of the PlantsByWebSphere.war to use my custom widget instead of the normal one. To accomplish this, I first add the following to the HTML head section:<script type="text/javascript">
ceadojo.registerModulePath("extension","../cea/extension");
ceadojo.require("extension.ClickToCall");
ceadojo.require("dojo.parser");
</script>
After that is taken care of, I change the value of the
ceadojoType attribute. Before it referenced the
cea.widget.ClickToCall widget shipped with the CEA Feature Pack. As seen below, I change the
ceadojoType attribute's value to
extension.ClickToCall.
<TD>
<h2>Click To Call</h2>
<div id="clickToCallWidget">
<!-- Replace 'CSR@localhost' with the user and address to be contacted when a clickToCall call is initiated -->
<div ceadojoType="extension.ClickToCall" widgetNumber="sip:CSR@localhost" enableCollaboration="true"
canControlCollaboration="true" defaultCollaborationUri="index.html">
</div>
</TD>
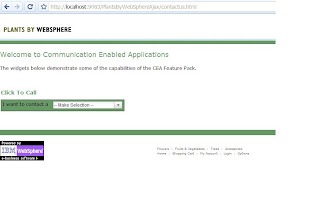
Now I'm ready to test out my changes. When I visit the
contactus.html page, I'm greeted by a different view:
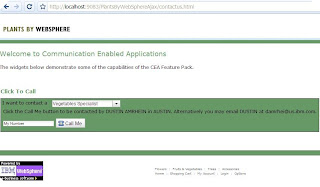
Once I select a particular specialist I want to contact, I then see information about the person who will be contacting me:
This is just one example of how the widgets provided by the WebSphere CEA Feature Pack can be extended to deliver customized function and behavior. I hope this helps give you a glimpse into the basic pattern for customizing the WebSphere CEA widgets. By the way, you can download a PDF of the JavaScript and HTML displayed above
here.


